
Playhouse to Penthouse- The Full Story
Hello blog buddies!
A few weeks ago I shared a full list of products we used to enhance our Backyard Discovery play structure and the simple story behind our project. Today I want to share a little bit more detailed and technical information for anyone interested in pulling off their own playhouse to penthouse transformation!
Square One: Select Your Swing Set
First thing’s first: Find a swing set/playground/hobby house that sparks joy for you and your family. There are so many options with a huge range of sizes, styles, and price ranges! We ended up selecting the Bristol Point BD unit, which we found in stock at Sam’s Club. I can’t presently find it available for shipping, but check back frequently as I struck out two days before we made our purchase. Send me an email if you’re looking and I’ll keep an eye out for you too! Here’s a direct link to the product from Sam’s Club, as well as the manufacturer:
https://www.samsclub.com/p/bristol-swing-set-a-wooden-swing-set-asm/prod22760217
https://www.backyarddiscovery.com/products/bristol-point-wooden-swing-set
Step Two: Plan Your Playhouse
While we waited for our structure to ship, I spent some time scouring the stock images to come up with a plan. I took in all of the various spaces, and contemplated all the things I wanted our kids to be able to feel and experience in their pediatric sanctuary. I basically asked myself: “What would you turn up for in a playhouse if you were between the ages of 3 and 10?” I then purchased budget-friendly versions of those things online. I saw some things about the structure that I knew I wanted to change- like the mean green sliding machines staring at me from my screen. In case you haven’t read our initial post, I’ll summarize! We painted every single surface that came bright green/yellow a shade of black or grey to yield a farmhouse-inspired cedar children’s palace. We left the wood unaltered- a decision I’m happy with for now. Honestly the vision I had in my head looked exactly like our grand finale. For context, here’s a picture of the final product!
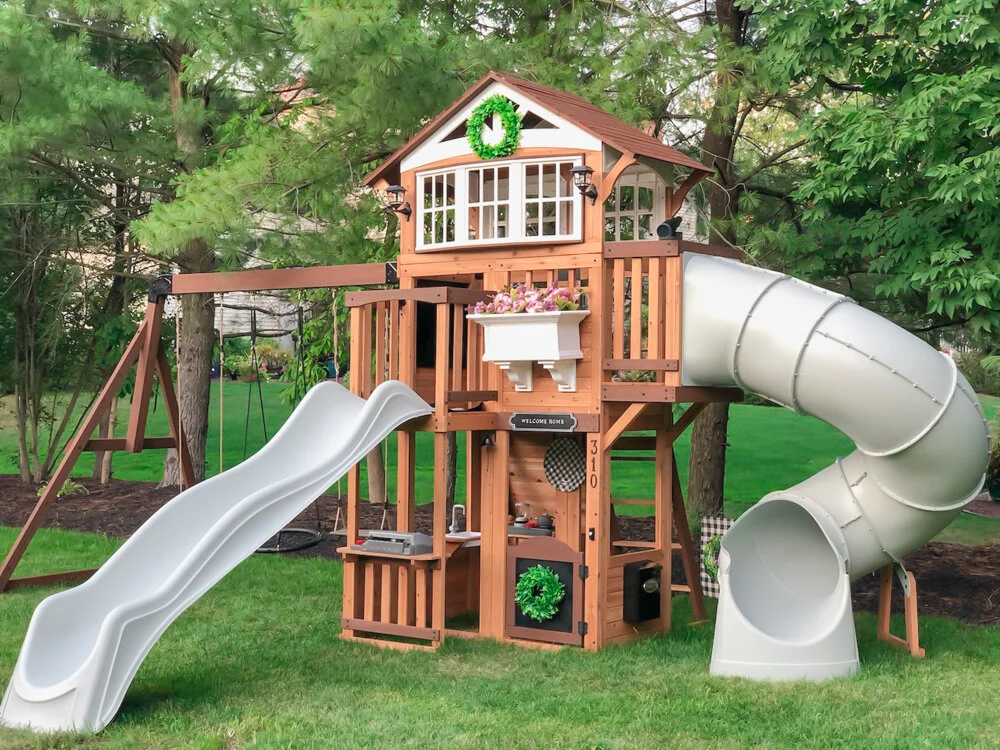
Even adults want to take a turn on this playground.
Planning Phase One: Color Me Excited
The first decision I made was what to do with the two slides that came in a dark green color. I wasn’t highly averted to their appearance- but I did feel like the structure would look extremely homogenous and sort of blend into the grass/tree line if left unaltered. The exterior of our home is brick with cedar siding and trim painted in two shades of grey. I opted for a shade of grey lighter than those on the house (SW Magnetic Grey) but one that would compliment the furniture and decor we have on our deck. I wanted the playhouse to feel like an extension of our outdoor living space. After making the color selection for the slides, I made the decision to paint all green hardware SW Tricorn Black (swing set brackets/rear-entry handles), and all plastic additions (telescope, rock wall, steering wheel) SW Iron Ore. To keep a cohesive feel, I tried to paint all items that were shipped in one color the same new shade. This allowed for a more balanced color palate over the entire surface area of the structure.
Planning Phase Two: Pick Your Paint
After making the decision about what colors to use on our structure, we researched what type of paint and primer would be optimal. Honestly, if we had done a smaller playhouse I would have most likely used canned spray paint made specifically for plastic. Because we had so much work to do, we decided to use the paint sprayer we invested in earlier this year to use on our deck with gallons of paint. I’m so glad we went that route... as is the ozone layer. We ended up using an Extreme Bond Primer from SW tinted to our “Magnetic Grey” for both of the slides, and all of our paints were the Solo Exterior line. In retrospect, I wish we would have invested a little bit more and used the Resilliance Exterior line- more pricey but I think it would have been worth it to protect from moisture damage. Here are direct links to each of the paints/primer I mentioned:
https://www.sherwin-williams.com/homeowners/products/extreme-bond-primer (tinted: Magnetic Grey)
https://www.sherwin-williams.com/painting-contractors/products/solo-interiorexterior-acrylic-paint (Used)
https://www.sherwin-williams.com/homeowners/products/resilience-exterior-acrylic-latex (Higher End)
Construction Phase One: WTHeck
When the five boxes arrived in our driveway I immediately wished for Jesus to return because I did not want any part of sorting/assembly. You. Will. Be. Overwhelmed! It’s okay. It can be done! The first thing Dre did was download the BILT App. The set also came with paper instructions but we absolutely loved the step-by-step narration and 3D visualizations. Then, he got out all the hardware and lined the packets up in numerical order down the length of our workshop. I would 10/10 encourage you to adopt some system like this as it made it super fast/efficient to go fetch the next nut/bolt/screw/doohickey. We had a general idea of what was in each box, as they all came with a packing slip. We gathered all the suggested tools and prayed hard and embarked on the most epic DIY adventure of our lives.
Construction Phase Two: Paint It All Black (Or Grey)
We decided to knock the painting out early because we knew we would be doing multiple coats on multiple pieces, and we wanted them to be dry before they were needed. That worked out fine, but it also left items sitting around for a week and a half, making them vulnerable to a toddler with contraband screwdrivers ETC. If it had been possible, I probably would have waited to prime and paint the slides until 48 hours before their permanent installation. Nonetheless, we applied two coats of primer and two coats of paint to the long slide, the deconstructed tube slide, and all associated hardware. It took 75 years. Or at least it felt that way. The tube slide came in at least 15 different pieces. Each one had to be sprayed, allowed to dry, then flipped, and the process was repeated. If and when we have to touch the slides up, they will remain attached and intact. I cannot imagine taking the slides completely apart again. We sprayed all other green/yellow items with the Tricorn Black and Iron Ore and allowed them to dry. This was the messiest part, but it didn’t take very long. We spent at most 4 hours total painting. The sprayer made it so fast!
Construction Phase Three: I’m Not BILT For This
For about 14 days we did exactly what the robot lady who lives in the BILT app told us to do, whenever she told us to do it. Part of the reason it took so long to complete was because Dre (who is actually Dr. Dre) had to dip out some evenings to resect colons/tend to other various anatomical anomalies. Other excuses include: it was hot/I had 4 teeth extracted/it was boring. We just kept plugging away, including the children wherever we could, and eventually the contents of the boxes dwindled until our happy little house came to life. You CAN pay someone to come assemble it. That service was offered through Sam’s Club but my pride got in the way- and also we had so many wild additions to make. We did have a sympathetic neighbor help us with the tube slide (bless you, Tom.) I would definitely suggest recruiting cost-free helpers if possible. I believe some people would refer to those as “friends.”
Here’s a link to the APP we used to help make assembly easier:
https://biltapp.com/download-bilt/
Construction Phase Four: The Glow Up
This was the most fun phase! After the structure was complete, I added on all of the little personal touches that made this space unique to our family. Some of the things I added include:
Wreaths
Mailbox
House Number
Doorbell
Welcome Signs
Solar Lights
Puck Lights
Kitchen Toys
Kitchen Storage
Web Swing
Pine Swings
Payphone
Adventure Sign
Dress-up Costumes
Window Box
Welcome Mat/Rugs
Literally anything that is safe and special to your family could be adapted to make a play space custom suited for your little people. Get creative. Use your imagination. Ask your kids for their input if you’re feeling frisky!
The Final Phase: Make Memories
Enjoy the fruits of your labor! I genuinely enjoy looking out our family room windows and seeing the playhouse. Not only does it look beautiful, but it makes me feel beautiful things. I am proud of what we accomplished. I am grateful for the little people who will give it all meaning. The toys will be scattered and I’ll have to touch up the paint, but that’s true of our indoor living spaces too! Don’t be afraid to think outside the box and within your budget to create purposeful and meaningful play spaces for your family. That includes big kids and fur kids and grown folks too!
Wishing each of you big, beautiful blessings as you care for the projects in your lives that are calling to you!
Romain calm and cheerful,
xoxo Amanda
Just in case you haven’t checked out our first blog post, I’ve included all the amazon links for you here too!